Wear OS apps with Flutter (3/4): Using Platform Channels to implement custom functionality (location & user text input)
Learn how to use Platform Channels to implement custom native functionality in Flutter, such as getting the device location or asking for user text input in Wear OS.

Check out part 1 for an introduction to Wear OS and common design guidelines and part 2 to setup and install your first Wear OS app!
Wear OS support in existing Flutter packages is limited. For example, if you want to get the device's location, the most common ways tend to be to install a package like location or geolocator. However, both of these currently have known issues or incompatibilities with Wear OS.
It's still very easy to implement our own native code that can be called from Flutter, using Platform Channels. With Flutter, it's always easy to rely on these abstractions that are provided for us, but Platform Channels are very useful to understand, because they are actually how all the packages we use are implemented under-the-hood – they just wrap platform-specific native code as a helpful API.
In short, they provide a way for our Flutter code to call some native platform-specific code. That could mean we create, for example, a simple getLocation function which in turn calls some Kotlin code on Android devices, some Swift code on iOS devices, and so on – all automatically, without us, as the Flutter developer, needing to worry about which device/OS/platform our app is running on.
As we are creating a simplified Wear OS (Android)-only app in this case, we can implement just the Kotlin side of the Platform Channel as an example.
Implementing Platform Channels for Android with Kotlin
There are 2 parts to this: the native Android (Kotlin) side and the Flutter side (our 'app').
In my app, there were 2 times in which I needed to make use of Platform Channels: to implement a getLocation function and a getUserTextInput function (to show the Wear OS keyboard so the user can type some short text).
Getting the device location
Let's start with the Kotlin side of implementing a getLocation function: we need to write the code that will actually be run that uses the Android SDKs, using Kotlin. We need to write this code in the MainActivity.kt file in the android/app/src/main/kotlin/com.mypackage.name directory.
For location specifically, we can make use of the Fused Location Provider (FLP) API. This is ideal for use-cases where we just want to get the current location as a one-off (as opposed to continuously tracking it for activity tracking purposes – see the linked docs for details on how to implement that). FLP will automatically determine the best way to get the current location; for example, it might get the location from the connected phone if that's recent rather than wasting battery to use the watch's GPS.
To use this API, we first need to define it as a dependency in our app – add the following to android/app/build.gradle.kts:
dependencies {
    implementation("com.google.android.gms:play-services-location:21.3.0")
}
Platform Channels are quite simple: we need to override a configureFlutterEngine method and implement a method call handler. The method call handler takes a parameter that is the name of the 'method' we want to create. In our case, we can call it getLocation, and this is what we will call from the Flutter-side too.
The code to implement this might look like something below – remember to update the CHANNEL variable, because this is used to define the 'name' of our Platform Channel.
class MainActivity : FlutterActivity() {
  private val CHANNEL = "com.mypackage.name"

  private lateinit var fusedLocationClient: FusedLocationProviderClient
  fun handleLocationSuccess(location: Location?, result: MethodChannel.Result) {
    location?.let {
      result.success(hashMapOf("latitude" to it.latitude, "longitude" to it.longitude))
    }
            ?: result.error("Failure", null, null)
  }

  fun handleLocationFailure(exception: Exception, result: MethodChannel.Result) {
    println(exception.message)
    result.error("Failure", exception.message, null)
  }

  fun getCurrentLocation(result: MethodChannel.Result) {
    fusedLocationClient = LocationServices.getFusedLocationProviderClient(this)
    fusedLocationClient.flushLocations()

    val priority = LocationRequest.PRIORITY_HIGH_ACCURACY
    val cancellationTokenSource = CancellationTokenSource()
    fusedLocationClient
            .getCurrentLocation(priority, cancellationTokenSource.token)
            .addOnSuccessListener { location: Location? -> handleLocationSuccess(location, result) }
            .addOnFailureListener { exception -> handleLocationFailure(exception, result) }
  }

  override fun configureFlutterEngine(@NonNull flutterEngine: FlutterEngine) {
    super.configureFlutterEngine(flutterEngine)
    MethodChannel(flutterEngine.dartExecutor.binaryMessenger, CHANNEL).setMethodCallHandler {
            call,
            result ->
      if (call.method == "getLocation") {
        getCurrentLocation(result)
      } else {
        result.notImplemented()
      }
    }
  }

}
Finally, we can actually call this code from Flutter like this:
static const platform = MethodChannel('com.mypackage.name');
final coordsResult = await platform.invokeMethod('getLocation');
Now, coordsResult will throw if our Platform Channel called result.error at any time, or return whatever was passed to result.success – in our case, a HashMap of {latitude, longitude}!
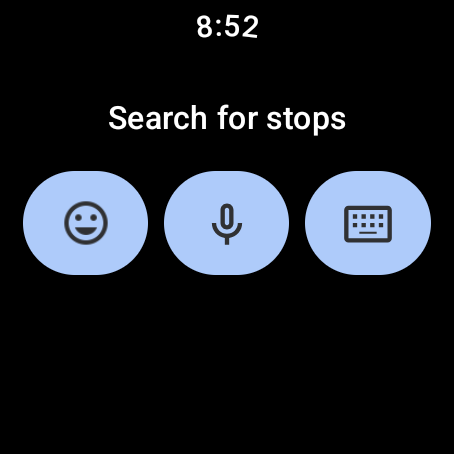
Getting user text input via the Wear OS keyboard
In Wear OS, getting user textual input isn't as simple as a normal Flutter app, where you might use a TextField widget. Instead, Wear OS has it's own keyboard and UI for accepting user input – this page might look familiar to you:
I couldn't find a built-in or community-built package to show this screen on Wear OS. But now that we have the base implementation of configureFlutterEngine, it's actually quite trivial to add more methods. We just need to add another else if for more names of our call.method.
The way this would normally be shown in a vanilla native Android app is to call the RemoteInput API. There's more information on the official docs on creating and using input editors in Wear OS too. To use this, we first need to add another dependency to our android/app/build.gradle.kts:
dependencies {
  ...
  implementation("androidx.wear:wear-input:1.2.0-alpha02")
}
Now, we can implement a new getText method in our method handler, like this:
...
} else if (call.method == "getText") {
        val remoteInputs: List<RemoteInput> =
                listOf(RemoteInput.Builder(REMOTE_INPUT_KEY).setLabel("Enter text").build())
        val intent: Intent = RemoteInputIntentHelper.createActionRemoteInputIntent()
        RemoteInputIntentHelper.putRemoteInputsExtra(intent, remoteInputs)
        _inputResult = result
        startActivityForResult(intent, TEXT_INTENT_ID)
} else {
...
This creates an Intent created by the RemoteInput API to display the native input screen. We store the result of the Platform Channel under _inputResult, so that we still have a reference to it when the Intent returns the text entered by the user.
We call startActivityForResult with a 2nd 'request code' parameter TEXT_INTENT_ID, which is an arbitrary number that we can define to uniquely identify the results of different activities in our app. This way, when various activities return, we can identify what each one is. We also define a REMOTE_INPUT_KEY constant for the RemoteInput so that we can extract the text entered later:
  private val TEXT_INTENT_ID = 1
  private val REMOTE_INPUT_KEY = "input"
Now we can listen for the result of the activity as follows, by using the TEXT_INTENT_ID to identify the correct Intent result, and REMOTE_INPUT_KEY to extract the text entered:
  override fun onActivityResult(requestCode: Int, result: Int, intent: Intent?) {
    if (requestCode != TEXT_INTENT_ID) return super.onActivityResult(requestCode, result, intent)

    if (result != Activity.RESULT_OK) {
      _inputResult.error("Error", "Error getting text", "")
      return
    }

    val inputResult = RemoteInput.getResultsFromIntent(intent)
    _inputResult.success(inputResult.getCharSequence(REMOTE_INPUT_KEY))
  }
Finally, we can call our input screen in Flutter just as we did earlier, but invoking the getText method this time!
static const platform = MethodChannel('com.mypackage.name');
final text = await platform.invokeMethod('getText');
text will now contain anything passed to inputResult.success above (in our case, the string contents that the user entered), or throw if we called _inputResult.error!
In the next part, we'll look at how to publish our Wear OS app on the Play Store, with tips on how to pass the Review process!