
Single Sign On (SSO) with subdomains using Caddy v2
A short guide on how to set up email/password SSO with Caddy v2 for multiple subdomains!

I've recently taken an interest in self-hosting simple open source applications — to have fun, take control of my privacy, and learn more about Linux, Docker and DevOps!
However, with this comes the need to add some form of authentication in front of all your services. For example, you probably don't want just anyone to be able to view all your RSS feeds, or use your markdown editor freely!
The most basic form is HTTP Basic Authentication, which is a pain as it must be configured and re-entered for each subdomain/service. You also need to type it out for each service, which can be challenging on mobile.
Single Sign On (SSO) on the other hand allows you to authenticate with different services with a single login. For example, if you have a Google account, you can go to youtube.com, gmail.com, drive.google.com, etc., without having to enter your login details again for each site — and each site has the same login details, saving you precious time!
There are already a few really useful guides and write-ups on using Caddy to set up an SSO system (e.g., see here and here), but I wasn't able to immediately figure out how to get this working with the latest Caddy v2 and use it on subdomains. I still wanted to stick with Caddy despite this, as it is extremely easy to set-up and provides automatic HTTPS certificates out-of-the-box, which is really useful when getting started!
This short blog post shows you how to configure a simple email/password SSO system with Caddy v2! By the end, it is as simple as adding a single line to add SSO to your subdomain!
[Update May 2022]: This post has been updated to work with caddy-security v1.1.10. If coming from elsewhere, note that caddy-auth-portal and caddy-authorize have been replaced with caddy-security!
Previous Updates
[Update February 2022]: The plugins used have been updated again! I have updated this post to work with the new caddy-security app (v1.0.12). If coming from elsewhere, note that caddy-auth-portal and caddy-authorize are now plugins that come with caddy-security!
[Update January 2022]: I have updated this post to work with the latest versions: caddy-auth-portal (v1.4.36) and caddy-authorize (v1.3.22). If coming from elsewhere it might be useful to note that the jwt directive has been renamed to authorize in newer versions!
[Update July 2021]: The plugins used were updated since I initially published this post. I have updated this post to work with the latest versions: caddy-auth-portal (v1.4.18) and caddy-auth-jwt (v1.3.14). If coming from elsewhere it might be useful to note that the auth_portal directive was renamed to authp in newer versions!
1. Download Caddy v2 with the caddy-security app
You need the app caddy-security, which comes with the necessary authentication (for the login form) and authorization (for the JWT token authorization) plugins.
You can get Caddy with the plugin through a variety of options: manually building from source, downloading the pre-built version from their download page, or (the easiest) using this direct link with the plugin pre-populated!
2. Set up your Caddyfile's directive order
In Caddy v2, there's a pre-set order of precedence for directives. See this issue on GitHub for more details.
But authorize and authenticate (the directives for the two plugins we installed) aren't in that pre-set; so we need to tell Caddy where they lie in the order of precedence.
At the top of your Caddyfile, add the following global options block:
{
    order authenticate before respond
    order authorize before reverse_proxy
}
Anything inside this block will apply globally for your entire config.
3. Set up your identity store
caddy-security supports using local username-password authentication or OAuth authentication (e.g., login with Google, etc.). Here, we'll configure it for local credentials using the security app, within the global options block we added above:
{
    ...
    security {
    	local identity store localdb {
            realm local
            path /etc/caddy/auth/local/users.json
        }
    }
 }
The path is important: it is the file in which your local users and their salted passwords will be stored! You'll also need to update this file to change user roles.
4. Configure your authentication portal!
Now we can add to the security app to set up our authentication portal that uses the localdb identity store we just set up:
{
    ...
    security {
        authentication portal myportal {
    	    enable identity store localdb
            cookie domain mydomain.com
            cookie lifetime 86400 # 24 hours in seconds
            ui {
                links {
                    "RSS" https://rss.mydomain.com
                    "Notes" https://notes.mydomain.com
                }
            }
            transform user {
                match email youremail@mydomain.com
                action add role authp/user
            }
        }
    }
}
Note: this config will automatically generate your secrets. If you're using multiple servers or need something more advanced, check out the official docs (the crypto key fields)!
You can also give your portal a name instead of myportal – we'll use this as a reference to the portal in the next step.
It's crucial to update the cookie domain — this is what makes it work for your subdomains! cookie lifetime allows you to choose how long your login cookies should last – note that it's in seconds!
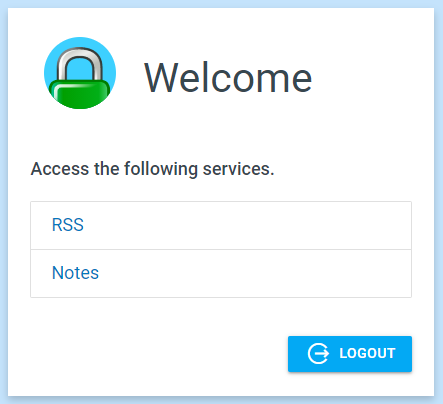
The ui directive is optional: if enabled, when authenticated on auth.mydomain.com, you will be provided with a very handy list of all your services:
The transform user directive allows us to add roles to users, and they can be quite powerful! For example, you might want to enable multi-factor authentication to certain (or all) users – check out the official docs for more.
It is possible to configure user registration through the UI. However, in recent versions of caddy-security, this now requires an email provider (e.g., through SMTP) which you might not want to configure, especially if this SSO setup is only for a few users. So, alternatively, you can edit the users JSON file manually (we set that path earlier!): copy/paste the superadmin user and update the duplicate to be your own details, e.g., change the password, the roles, ID, username, etc. Your new user object should look something like this:
{
      "id": "a3452039-c82f-4d67-87e4-3ab3d7e2fc2a",
      "username": "xxx",
      "email_address": {
        "address": "xxx@yyy.com",
        "domain": "yyy.com"
      },
      "email_addresses": [
        {
          "address": "xxx@yyy.xom",
          "domain": "yyy.com"
        }
      ],
      "passwords": [
        {
          "purpose": "generic",
          "algorithm": "bcrypt",
          "hash": "$2a$10$0xxxxxxxxxxxxxxxxxxxxxxxxxxxxxxxxxxxxxxxxxxx",
          "cost": 10,
          "expired_at": "0001-01-01T00:00:00Z",
          "created_at": "2022-05-27T12:44:24.749185362Z",
          "disabled_at": "0001-01-01T00:00:00Z"
        }
      ],
      "created": "2022-05-27T12:44:24.749185362Z",
      "last_modified": "2022-05-27T12:44:24.749185362Z",
      "roles": [
        {
          "name": "registered"
        }
      ]
    }
Note: the password is in hash, which you should generate with bcrypt – you can find lots of online tools to do this, or generate it through the command line using e.g., htpasswd, if you don't trust the online tools!
5. Set up an authorization policy
Within the security block we just added, add the following authorization policy:
{
   ...
   security {
       authentication portal myportal {
           ...
       }
       authorization policy admin_policy {
           set auth url https://auth.mydomain.com
           allow roles authp/user
       }
   }
}
The authorization policy has a name (admin_policy in this case) which lets you choose (amongst others!) who can access certain routes. We'll reference the name in routes we want to add SSO to in the next step.
Make sure you set the auth.mydomain.com to be your actual domain (it doesn't have to be auth. — it can be whatever you want as long as you're consistent!). You'll also need to update your domain's DNS settings to account for this new subdomain.
I'm not going to go over roles in this post, but the official docs explain exactly how they work! For my case, I'm only using it to authenticate my own account and want access to the /settings page to update my account details (password, keys, etc.), so authp/user should be fine!
6. Use your SSO!
Finally, we need to add the authorization portal to auth.mydomain.com:
auth.mydomain.com {
    authenticate with myportal
}
That's all the config done! Now whenever you want to enable SSO for a subdomain/service, just add the authorize with authorization_policy_name directive at the top.
For example, for the subdomain mainservice.mydomain.com:
mainservice.mydomain.com {
    authorize with admin_policy
    reverse_proxy http://localhost:1234
}
Now whenever anyone navigates to mainservice.mydomain.com, if they are not logged in, they will be redirected to auth.mydomain.com and will have to log in:
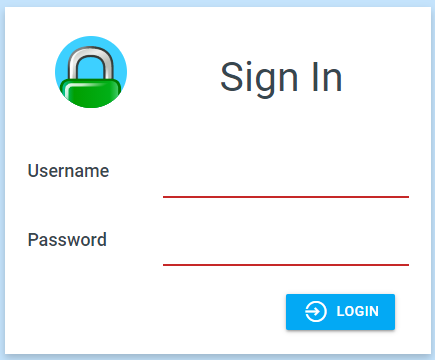
If you're already logged in (your browser will have a cookie), then it will just let you in!
The cookie will be shared across your subdomains, so you can freely switch between all your services without the pain of logging in every time!
What if you want some paths to be public but not all? You could do this:
service.mydomain.com {
    @allow path /public /anothersafepath
    handle @allow {
        reverse_proxy http://localhost:1234
    }

    authorize with admin_policy
    reverse_proxy http://localhost:1234
}
Because of the orders we set up earlier, this simply works from top-to-bottom because handle has higher precedence than authorize and also reverse_proxy. Here's the pre-defined order for reference!
If you wanted to instead only keep some paths secret, you could change the second line to @reject not path /secret /anothersecretpath (and change @allow to @reject in the third line!).
I hope this post helps setting up your SSO with Caddy. I'd highly recommend trying it out if you find yourself always needing to authenticate with different services on your domain – and check out caddy-security's docs for even more advanced features!
Disclaimer: authentication is extremely important for a variety of services so please ensure your configuration works for you. In this blog I detail how you might use SSO but am in no way accountable for any privacy or confidentiality breaches as this is dependent on your configuration.