Using Bluetooth Low Energy on the Raspberry Pi Pico - Part 2/4: Using MicroPython on the Pico W
Introduction to MicroPython on the Raspberry Pi Pico W, building up to creating a custom BLE service for provisioning a Pico's WiFi settings through a web-page.

Just want a TL;DR to get it working?
Subscribers get access to TL;DR versions of all my blog series!
MicroPython
The Raspberry Pi Pico supports both C/++ and MicroPython. We're using MicroPython in this series.
MicroPython is a condensed, more efficient implementation of Python 3, specifically designed to be run on microcontrollers like the Raspberry Pi Pico. The syntax is exactly the same as Python, and most of Python 3's features are compatible with MicroPython – so if you've programmed in Python before, there's little difference!
Flashing the Raspberry Pi Pico's firmware
To use MicroPython on the Raspberry Pi Pico, we need to flash its firmware, to provide the base software that will run our code – essentially, we need to install MicroPython on it.
Unlike the original Raspberry Pi devices, which were full single-board computers that could run a normal Operating System like Linux, the Raspberry Pi Pico is a microcontroller. A microcontroller is suited for controlling smaller tasks, and they're usually programmed to do one specific task, rather than a computer which might do various tasks at once. This difference is also the reason we need to flash the Pico, differently to how we might program on a Raspberry Pi.
To flash the Pico, we first need to download the appropriate .uf2 (USB Flashing Format) file. There are different UF2 firmwares available for the Pico, such as for C/C++ or MicroPython. You can download the latest firmware from the Raspberry Pi website (make sure you choose the "Raspberry Pi Pico W with Wi-Fi and Bluetooth LE support" version for this series). Here's a direct link if you are having difficulties.
Once you've got it downloaded, plug in your Pico with it's micro-USB cable to your computer, whilst holding down the small white BOOTSEL button on the back of the Pico. It should appear on your computer as a regular USB volume called RPI-RP2. We just need to drag-and-drop/copy the UF2 file to this USB volume to install the firmware. The Pico will automatically reboot; this time, outside of BOOTSEL mode – so we are ready to program it!
Setting up the Thonny IDE
To program our Pico, we also need an IDE (Integrated Development Environment). Thonny is a simple Python IDE designed for beginners, which has built-in support for MicroPython and the Raspberry Pi Pico. You can download it for Windows, Mac, and Linux from Thonny's website.
You can also use Visual Studio Code for programming your Pico – this is out of scope of this guide, but you can learn more at the official Raspberry Pi Pico VS Code extension GitHub repository.
Programming the Pico
Now that we've got the firmware loaded and an IDE installed, we're ready to program the Pico using MicroPython. We can try flashing the built-in LED on and off as an example.
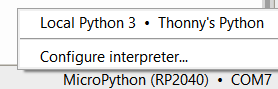
In Thonny, select your Pico from the bottom-right device selector:
And then create a new main.py script (see the comments for an explanation):
# `machine` library provided through the MicroPython firmware we flashed earlier
from machine import Pin
import time

# Create a reference to the built-in LED as an output at pin number 25
led = Pin(25, Pin.OUT)

# We want our program to run continuously until stopped (powered off)
while True:
    # Turn the LED on, wait 1 second, turn it off, then wait 1 second, and loop forever
    led.value(1)
    time.sleep(1)
    led.value(0)
    time.sleep(1)
Example MicroPython code to flash the built-in LED on the Pico
main.py by default when it starts (when the Pico boots), so make sure you name the file main.py!Now, we can run the code with the Play button at the top. You should see your Pico's LED flashing!